Most civilian setups fail not because of ballistic inadequacy, but because the Backpack Body Armor Guide usually ignores load stabilization, resulting in a 5lb plate slumping to the lumbar region and leaving the thoracic cavity exposed. This field report details how to anchor armor correctly and why selecting between Level IIIA soft inserts and ceramic plates fundamentally changes your bag’s geometry.
Disclosure: All products have affiliate links for earning commission to support the website when you purchase
| Setup Type | Ballistic Rating | Weight Penalty | Field Application |
|---|---|---|---|
| Custom Soft Insert | Level IIIA (Handgun) | 1.0 – 1.5 lbs | EDC / Commuter / Airport Travel |
| Hard Plate (Ceramic/PE) | Level III / IV (Rifle) | 4.5 – 8.0 lbs | Vehicle Kit / Active Shooter Response |
| Surplus Vest Cut | Level II (Expired) | 2.0 – 3.0 lbs | Budget / Emergency Backups |
The “Sag Effect” and Positional Instability
The immediate issue I found when retrofitting a standard consumer backpack (like a North Face or JanSport) with armor is the lack of a rigid frame sheet. A standard backpack is essentially a nylon sack designed for books and clothes, not high-density weights.
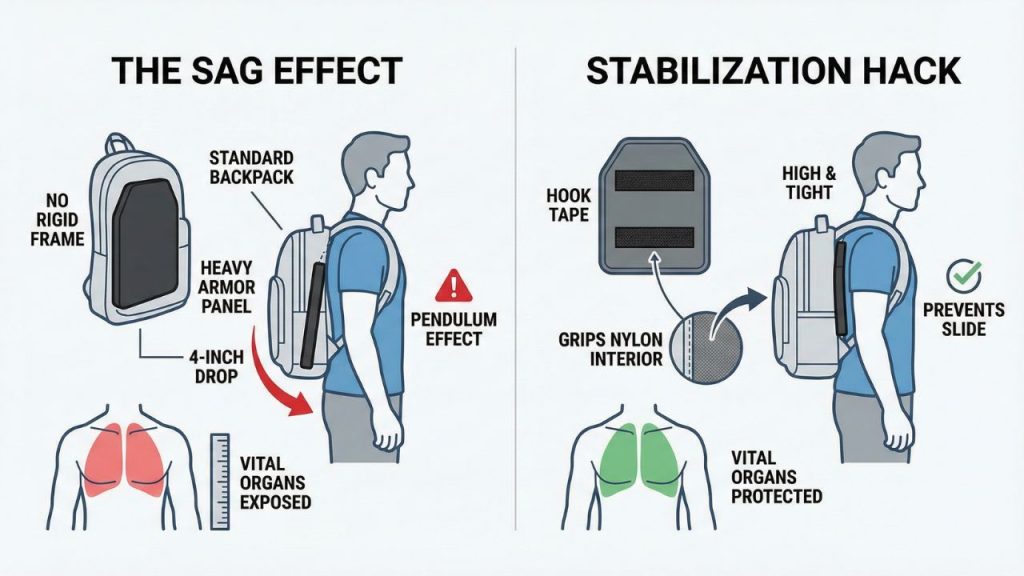
When you drop a loose armor panel into the main compartment, gravity pulls it to the bottom. In a panic scenario where you are running, the armor creates a pendulum effect. More critically, the armor often settles dangerously low. I measured a 4-inch drop in standard bags, which means your upper lungs and aortic arch are completely exposed even while wearing the protection.
If your bag lacks a dedicate high-ride laptop sleeve, standard hook-and-loop (Velcro) is your best friend. I apply two strips of heavy-duty adhesive “Hook” tape to the back of the armor panel. This grips the interior nylon fabric of most backpacks aggressively enough to prevent the “slide” during movement, keeping the plate high and tight against the spine.
Material Analysis: Soft IIIA vs. Hard Plates
Your threat assessment dictates your material. Most users instinctively want “bulletproof” (Level IV) protection, but the logistical penalties often result in the gear being left at home.
Soft Armor (Level IIIA)
Constructed from layers of Aramid (Kevlar) or Ultra-High-Molecular-Weight Polyethylene (UHMWPE), these panels entrap the projectile in a web of fibers. They are rated for handgun calibers up to .44 Magnum. The primary advantage is compliance; a soft panel flexes with the backpack, maintaining the bag’s natural profile without screaming “tactical.”
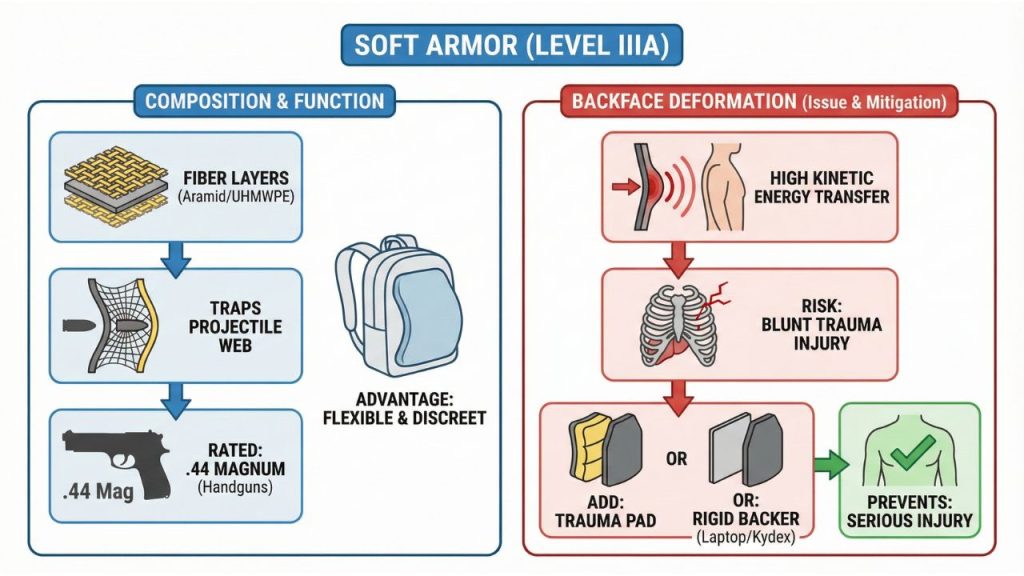
However, users must understand Backface Deformation. While the slug is caught, the kinetic energy transfer is violent. Without a trauma pad or a rigid backer (like a laptop or Kydex sheet), the blunt force can still crack ribs or cause internal hemorrhage.
Hard Armor (Level III/IV)
Steel, Ceramic, or polymerized plates are required to stop rifle rounds (5.56/.308). While effective, I found that placing a hard plate in a designated laptop sleeve poses a risk to electronics. The rigidity of a ceramic plate creates a pressure point that can screen-crush a laptop if the bag is dropped. If you run hard plates, you must sandwich a foam layer (like a yoga mat slice) between the plate and your device.
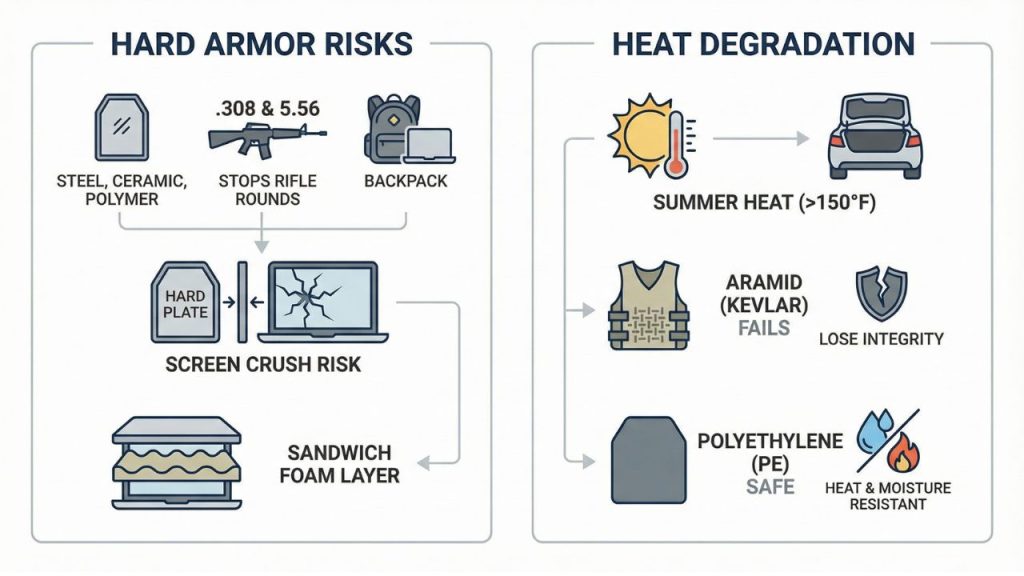
Do not store Aramid-based soft panels in your car during summer. I have seen older Kevlar vests lose ballistic integrity after prolonged heat exposure (above 150°F). If your kit lives in a trunk, opt for Polyethylene (PE) plates, which are chemically inert and impervious to heat and moisture.
Top Recommended Configurations
1. The “Gray Man” Setup: Premier Body Armor Custom Inserts
Rather than a universal rectangle that leaves gaps at the corners, brands like Premier manufacture panels cut to the exact dimensions of specific bags (like the Vertx Gamut or 5.11 Rush). This eliminates the “slop” inside the compartment.
The fitment is generally tight enough that no auxiliary mounting is needed. Pricing is usually steep for the custom cut, typically MSRP $280, but often found around $230 during sales.
2. The Budget ROI: Surplus Police Panels
For those strictly budget-minded, I have successfully repurposed expired police vests. You can often purchase a used Level II vest for under $60. By removing the carrier and trimming the Aramid panel (and duct-taping the edges to preventing fraying), you get functional ballistic resistance for a fraction of the cost.
Warning: Cutting the panel technically compromises the seal, exposing the fibers to moisture. You must reseal the edges with waterproof tape immediately.
3. Dedicated Carry: Vertx Gamut Series
If you haven’t bought the bag yet, start with a chassis built for this. Vertx bags include a dedicated “Rapid Access” panel. This is a specific sleeve that sits closest to the user’s back, capable of holding a ballistic panel independently of the main storage area. This keeps the center of gravity correctly aligned and prevents the equipment from printing (showing an outline) through the fabric.
In a life-threatening scenario, your MacBook is a disposable trauma plate. If you are using a soft insert, place your laptop between the armor and your body if possible, or directly behind it. While the armor stops the perforation, the laptop chassis helps distribute the blunt force energy across a wider surface area, reducing localized trauma to your spine.